


Introduction
Install a microwave can seem daunting, but with the right guidance, it becomes a manageable task. This article will walk you through everything you need to know about installing a microwave, from selecting the right type to completing the installation safely and efficiently.
Table Of Content
- Introduction
- Choosing the Right Microwave
- Types of Microwaves
- Size Considerations
- Features to Look For
- Tools You’ll Need
- Essential Tools
- Optional Tools for Convenience
- Preparing Your Space
- Checking Electrical Outlets
- Determining Placement
- Measuring for Fit
- Installation Steps
- Step 1: Safety First
- Step 2: Remove the Old Microwave (if applicable)
- Step 3: Install a Microwave the Mounting Template
- Step 4: Secure the Mounting Bracket
- Step 5: Connect the Ductwork (for vented models)
- Step 6: Lift and Secure the Microwave
- Step 7: Make Electrical Connections
- Testing Your Microwave
- Powering It On
- Running a Test Cycle
- Conclusion
- Final Tips for Success
- Encouragement to Enjoy Your New Microwave
- FAQs
- Can I install a microwave by myself?
- What is the best height for install a microwave?
- Do I need a dedicated circuit for my microwave?
- How do I know if my microwave is vented or recirculating?
- What should I do if my microwave isn’t heating properly?
Whether upgrading your kitchen or replacing an old unit, this comprehensive guide will ensure you have all the tools and knowledge needed for a successful installation.

Choosing the Right Microwave
Types of Microwaves
Microwaves come in various types, including countertop, built-in, over-the-range, and drawer models. Countertop microwaves are portable and easy to install, making them suitable for smaller kitchens.
Built-in microwaves provide a seamless look by integrating into cabinetry but require more complex installation. Over-the-range install a microwave above range serve dual purposes by functioning as both a microwave and a range hood, making them popular in kitchens where space is limited. Drawer microwaves are unique and can be installed at waist height for easier access.
Size Considerations
When selecting a microwave, size is crucial. Measure your available space carefully, ensuring you account for ventilation and door clearance. Standard countertop models range from 0.5 to 2.2 cubic feet.
Install a microwave over-the-range usually have a width of 30 inches, but ensure they fit your cooking space comfortably. Don’t forget to consider the height and depth, especially if your microwave will be installed in a cabinet or under a shelf.
Features to Look For
Modern microwaves come with various features that enhance their usability, such as inverter technology for even cooking, sensor cooking that adjusts time and power automatically, and easy-clean interiors. Other features include preset cooking options, child safety locks, and Wi-Fi connectivity for remote control. Decide which features are most relevant to your cooking needs to make an informed choice.
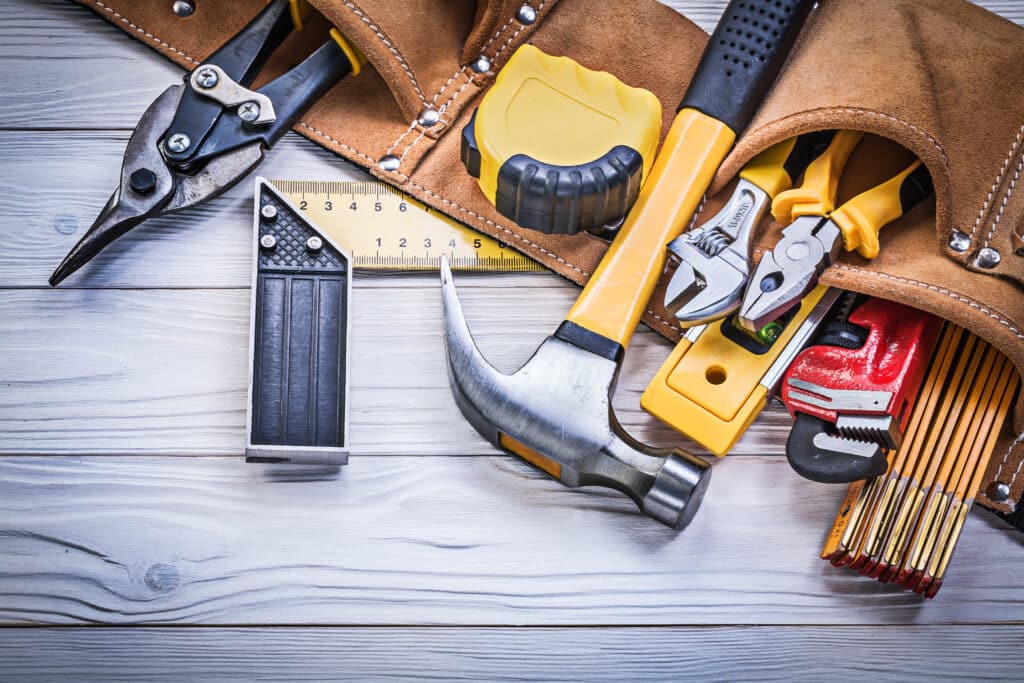
Tools You’ll Need
Essential Tools
Before starting, gather the essential tools for your install a microwave. You will need a drill with a variety of bits, a level for ensuring straight installation, a measuring tape, a stud finder for locating wall studs, and screwdrivers—both Phillips and flathead. Safety goggles and a sturdy ladder may also come in handy, especially for over-the-range installations.
Optional Tools for Convenience
While not mandatory, a power screwdriver can speed up the process, and a second pair of hands can be invaluable when lifting the microwave. A flashlight is helpful for dark spaces, and a utility knife can assist with unpacking or trimming any excess material as necessary.
Preparing Your Space
Checking Electrical Outlets
Before install a microwave ensure you have a properly grounded electrical outlet. Microwaves typically require a dedicated circuit to avoid tripping breakers. Check the wattage requirements on the microwave’s specifications; most models need at least a 120-volt outlet. If your microwave will be vented externally, ensure the ductwork is ready for connection.
Determining Placement
Placement is key for both aesthetics and functionality. Over-the-range microwaves should be installed 18 to 24 inches above the cooktop for optimal use. For countertop microwaves, ensure there’s at least 3 inches of space on all sides for proper ventilation. Consider accessibility and headroom when choosing your final location.
Measuring for Fit
Accurate measurements can save you time and frustration. Measure the width, depth, and height of your microwave space. Also, double-check that your microwave’s dimensions fit within your cabinet or designated area. If you’re replacing an old microwave, ensure the new one aligns with existing cabinetry for a cohesive look.
Installation Steps
Step 1: Safety First
Before starting the installation, turn off the power at the circuit breaker to avoid any electrical hazards. Wear safety goggles and gloves to protect your eyes and hands during the installation process. This precaution is particularly important when drilling into walls or handling heavy appliances.
Step 2: Remove the Old Microwave (if applicable)
If you’re replacing an old unit, carefully disconnect and remove the old microwave. Make sure to detach it from the power and any existing ductwork. If it’s an over-the-range model, you may need to unscrew it from the mounting bracket, which can be heavy, so having someone assist you during this step is advisable.
Step 3: Install a Microwave the Mounting Template
Most new microwaves come with a mounting template to help you mark where to drill. Use the template to mark the location for the mounting bracket on the wall. Ensure it is level and properly aligned to prevent installation issues. Check the instructions that accompany your microwave for specific details regarding bracket placement.
Step 4: Secure the Mounting Bracket
Using a drill, secure the mounting bracket to the wall. Ensure it is anchored into a wall stud for stability, as this will support the weight of the microwave. Use a level to double-check that the bracket is horizontal before tightening all screws. This step is crucial for preventing the microwave from tilting after installation.
Step 5: Connect the Ductwork (for vented models)
If your microwave requires external ventilation, connect the ductwork before lifting the microwave into place. Ensure all connections are secure and that the duct is not crimped or obstructed. If you’re using a recirculating model, make sure to install the charcoal filter according to the manufacturer’s instructions.
Step 6: Lift and Secure the Microwave
With assistance, lift the microwave and hang it on the mounting bracket. Make sure it fits snugly against the wall, and then secure it with screws as indicated in the installation manual. Ensure that the microwave is level and securely fastened before proceeding to the next step. This is vital for its safe operation and longevity.
Step 7: Make Electrical Connections
Once the install microwave is securely mounted, plug it into the electrical outlet. If you have to hardwire it, follow the necessary steps to connect the wires safely, ensuring the power is off during this process. If in doubt, consult a professional electrician to make sure everything is safely installed.
Testing Your Microwave
Powering It On
After installation, turn the circuit breaker back on and power the microwave. Check the display panel to ensure it functions properly. If the microwave does not turn on, double-check your electrical connections and ensure that power is reaching the outlet.
Running a Test Cycle
Run a test cycle using a cup of water to ensure the microwave heats correctly. Place a microwave-safe cup of water inside and set it for 1-2 minutes. If the water heats evenly, your installation was successful. If not, double-check your installation, especially the electrical connections and settings.
Conclusion
Final Tips for Success
Always refer to the manufacturer’s instructions for specific guidelines related to your microwave model. Take your time during the installation process, as rushing can lead to mistakes or potential hazards. If you encounter difficulties, don’t hesitate to seek professional assistance.
Encouragement to Enjoy Your New Microwave
Now that you’ve successfully installed your microwave, take a moment to enjoy the convenience it brings to your kitchen. Whether reheating leftovers, defrosting ingredients, or experimenting with new recipes, a microwave can significantly enhance your cooking experience.
FAQs
Can I install a microwave by myself?
Yes, many people install a microwave themselves. However, having a friend assist can make the process smoother, especially for heavier models.
What is the best height for install a microwave?
For over-the-range microwaves, 18 to 24 inches above the cooktop is recommended for easy access and functionality.
Do I need a dedicated circuit for my microwave?
Yes, most microwaves should have a dedicated circuit to avoid tripping breakers and to ensure optimal performance.
How do I know if my microwave is vented or recirculating?
Check the specifications in your user manual. Vented microwaves have external ductwork, and while recirculating models, they filter air back into the kitchen without ducts.
What should I do if my microwave isn’t heating properly?
If your microwave isn’t heating, check the power supply and connections. Refer to the troubleshooting section of the user manual or consult a professional if the issue persists.


