


A hairline crack in a front stoop may look like a cosmetic annoyance, but a widening crack or loose edge can become a trip hazard fast. Knowing how to repair cracked concrete steps starts with one practical question: is the concrete still stable enough to patch, or is movement underneath causing the damage?
Table Of Content
- Check Whether Your Concrete Steps Can Be Repaired
- Tools and Materials for a Lasting Patch
- How to Repair Cracked Concrete Steps
- Clean out the damaged area
- Decide between filler and repair mortar
- Mix and place the patch
- Match the texture and cure it correctly
- Fix the Cause Before the Crack Returns
- When Replacement Makes More Sense
Understanding how to repair cracked concrete steps is essential for maintaining outdoor safety and aesthetics.
Small, stable cracks are often an affordable DIY repair. Concrete that is sinking, separating from the house, crumbling deeply, or shifting with each season needs a closer look before you cover it with patch material. A good repair should make the steps safer and extend their life, not simply hide a problem for a few months.
When learning how to repair cracked concrete steps, it’s crucial to assess the type of crack you have.
Check Whether Your Concrete Steps Can Be Repaired
Start by cleaning the steps and looking at the entire staircase, including the landing, sidewalls, and the joint where the steps meet your foundation. Surface cracks less than about 1/4 inch wide, small chips along a tread, and shallow spalling are usually good candidates for repair.
Once you identify the cracks, the next step in learning how to repair cracked concrete steps is to gather your tools.
Pay more attention to cracks that run across the full width of a step, grow wider at one end, or have one side sitting higher than the other. Those signs can point to settlement, frost heave, poor drainage, or failure in the base below the concrete. A patch will not stop that movement.
Call a concrete contractor or structural professional before repairing steps if you see major separation from the home, exposed or rusting reinforcing steel, a stair section that rocks, or a crack wider than 1/2 inch that continues to open. The cost of an inspection is often far less than repeatedly patching a step that needs rebuilding.
Tools and Materials for a Lasting Patch
Before proceeding, remember that knowing how to repair cracked concrete steps involves choosing the right materials.
The best product depends on the damage. For narrow, non-moving cracks, use a concrete crack filler or flexible polyurethane concrete sealant. For chipped corners, spalled surfaces, and cracks that need to be built up, choose a polymer-modified concrete repair mortar. These products bond better and cure stronger in thin applications than a standard bag of concrete mix.
For most repairs, gather a stiff wire brush, shop vacuum or broom, hammer and cold chisel, margin trowel, finishing trowel, safety glasses, gloves, mixing bucket, and clean water. A small angle grinder with a masonry wheel can help open tight cracks, but it creates substantial silica dust. If you use one, wear appropriate respiratory protection and follow wet-cutting or dust-control practices.
Expect to spend roughly $25 to $75 for crack filler, repair mortar, and basic supplies if you already own hand tools. Larger repairs may cost $75 to $200 or more, especially if you need a grinder, concrete bonding adhesive, forms, or a resurfacing product.
How to Repair Cracked Concrete Steps
Following these guidelines will teach you how to repair cracked concrete steps effectively.
Clean out the damaged area
By following specific steps, you will understand how to repair cracked concrete steps properly.
Concrete patching material needs a clean, solid surface to grip. Use a wire brush to remove dirt, loose concrete, old caulk, paint flakes, and chalky material from the crack. Vacuum thoroughly afterward. Dust left inside the crack is one of the most common reasons a repair separates early.
For a crack wider than a hairline, use a hammer and cold chisel to carefully widen the opening at the base. The goal is a slightly undercut or V-shaped channel, with the crack a little wider below the surface than at the top. This gives rigid patch mortar something to lock into.
Remove every loose piece before moving on. If tapping around the crack causes more concrete to break away, keep going until you reach sound material. It can feel counterproductive to make the damaged area larger, but patching over weak concrete guarantees a weak repair.
Decide between filler and repair mortar
Use flexible crack filler for narrow cracks that may experience minor seasonal movement. These products are usually applied with a caulk gun or squeeze bottle and work well when the crack is clean and dry. Smooth the bead with a putty knife, following the manufacturer’s directions for depth and cure time.
Choosing the right option is part of the process of how to repair cracked concrete steps.
Use repair mortar for wider cracks, broken step noses, missing corners, and shallow surface damage. If the product calls for a bonding adhesive, brush it onto the prepared concrete and apply the mortar while the adhesive is still tacky. Some modern patch products are formulated to bond without a separate adhesive, so the label matters here.
Do not fill a moving expansion joint with rigid mortar. A joint between sections of concrete needs a flexible sealant so the slabs can expand and contract without cracking the patch.
Mix and place the patch
Next, you will see how to repair cracked concrete steps by mixing the materials correctly.
Mix only as much repair mortar as you can use during its working time. Many fast-setting products stiffen quickly, especially on a warm, dry day. Add water gradually until the mortar reaches the consistency recommended on the bag. Too much water makes it easier to spread, but it weakens the finished repair and can lead to shrinkage cracks.
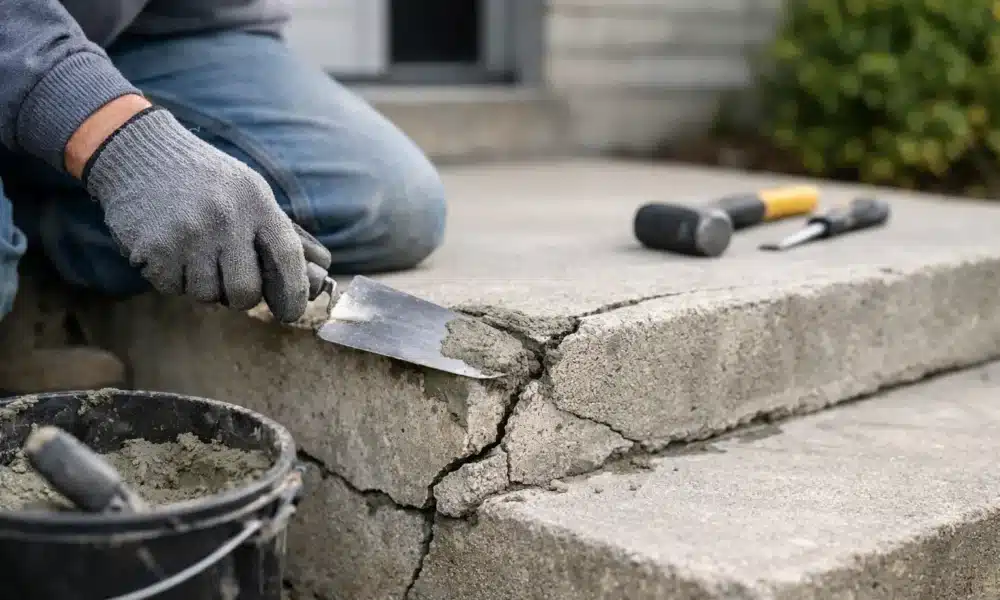
Press the mortar firmly into the crack or chipped area with a margin trowel. Work from the deepest section outward to eliminate air pockets. For a repair deeper than the product allows in one application, build it in layers rather than applying one thick coat that may slump or crack while curing.
Overfill the area slightly, then strike it level with the surrounding tread. On a stair edge, shape the corner with the trowel and use a straight piece of wood as a guide if needed. The edge does not need to look factory-new, but it should be firm, even, and safe underfoot.
Match the texture and cure it correctly
Finishing the surface is another key aspect of how to repair cracked concrete steps effectively.
Concrete steps need traction. Before the repair fully hardens, lightly drag a damp broom across the surface or dab it with a stiff brush to create a texture similar to the existing step. A glass-smooth patch can become slippery in rain, snow, or when someone is carrying groceries.
Protect the repaired area from foot traffic, direct pounding rain, and freezing temperatures during the product’s recommended cure period. Depending on the material, that can range from a few hours to several days. In hot or windy weather, lightly misting a cement-based patch or covering it with plastic can slow moisture loss and support a stronger cure. Follow the product label rather than assuming every mix cures the same way.
Fix the Cause Before the Crack Returns
Water damage is a common issue, so learning how to repair cracked concrete steps includes addressing drainage problems.
Water is behind many cracked-step repairs. Look for downspouts that dump water beside the stairs, soil that slopes toward the foundation, leaking gutters, or sprinklers that repeatedly soak the concrete. Redirecting runoff and maintaining positive grading can protect both the steps and the base beneath them.
In colder parts of the US, avoid using rock salt on concrete steps. Sodium chloride can worsen surface scaling, particularly on older or already damaged concrete. Use a concrete-safe ice melt sparingly, shovel snow promptly, and avoid metal shovels that can chip repaired edges.
A breathable concrete sealer can help limit water absorption after the repair has fully cured. Sealer is useful protection, not a cure for structural movement. If the steps are settling, improving drainage may help, but the underlying base still may require professional repair.
When Replacement Makes More Sense
Finally, knowing when to replace rather than repair is part of the broader context of how to repair cracked concrete steps.
Repair is usually the value choice when the damage is localized and the steps are level. Replacement becomes more practical when multiple treads are cracked through, the stair run has sunk noticeably, or repairs cover a large share of the visible surface. At that point, patch materials and labor can add up without delivering a durable or attractive result.
For a small concrete-step repair, DIY materials may stay under $100. Professional crack and spall repair often runs a few hundred dollars, while replacing a basic front stoop or set of poured steps can range from roughly $1,000 to several thousand dollars depending on size, access, demolition, reinforcement, finish, and local labor costs. Get a site-specific estimate when the damage involves settlement or foundation-adjacent concrete.
A careful patch can make your entry safer this weekend, but give the surrounding drainage equal attention. The most satisfying concrete repair is the one that still looks solid after the next freeze, heavy rain, and busy season at your front door.
Ultimately, understanding how to repair cracked concrete steps is a valuable skill for homeowners.