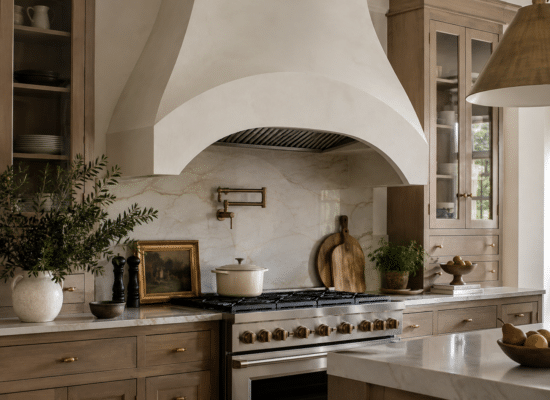


An arched range hood is one of the few kitchen details that changes how a room feels from the doorway. Instead of a stainless box bolted to the wall, you get a soft curved form — usually plaster, sometimes wood or tile — that reads as part of the architecture rather than an appliance. It photographs beautifully, which is part of why it keeps showing up on design feeds. It also fails quietly when someone treats it as decoration and forgets there’s a fan inside. This guide covers what’s actually behind the curve, how to size the ventilation before you draw a single line, the three common ways these hoods get built, and where the money goes.
Table Of Content
- What an Arched Range Hood Actually Is
- Why Arched Range Hoods Are Having a Moment
- Size the Ventilation Before You Design the Curve
- Start with CFM
- Width and mounting height
- Ducting is where quiet hoods are won or lost
- Three Ways Arched Range Hoods Get Built
- Plaster over curved framing
- Bent drywall with a skim coat
- Clad in wood, tile, or stone
- Proportion: The Part Most People Skip
- What It Costs — and What Drives the Number
- Living With One
- Key Takeaways
- FAQ — People Also Ask
What an Arched Range Hood Actually Is
Here’s the part that trips people up: an arched range hood is almost never a single product.
What you’re looking at is two things stacked. Inside is a range hood insert (also called a liner or power pack) — a stainless steel box containing the blower, the baffle filters, the lights, and the controls. Around it is a custom enclosure, shaped and finished to look like a piece of the wall.
The arch is the enclosure. The ventilation is the insert. You buy them separately, and they solve completely different problems.
That split matters because it’s where responsibility gets fuzzy on a job site. The cabinetmaker or plasterer builds a gorgeous curve. The appliance guy installs whatever insert fits. Nobody has checked whether the insert’s clearance requirements work inside that specific shape. Six months later the filters are a wrestling match to remove, or the hood runs loud because the duct has three elbows in four feet.
Decide the insert first. Draw the arch around it.
Why Arched Range Hoods Are Having a Moment
The broader shift is toward softer geometry — curved islands, arched doorways, rounded cabinet ends — and away from the hard-edged minimalism that dominated kitchens for most of the last decade.
There’s also a practical driver. A wall of upper cabinets flanked by a stainless hood is visually busy. A plaster arch is a single quiet mass. In an open-plan kitchen where you can see the range from the living room, that difference is significant. The hood stops looking like equipment.
The look pairs naturally with warm neutrals, unlacquered brass, and matte finishes. If you’re rethinking the whole wall, it’s worth coordinating the hood decision with your backsplash material and how high it runs — a continuous finish from counter to hood is a large part of why these kitchens look intentional rather than assembled.
Size the Ventilation Before You Design the Curve
Start with CFM
Airflow is measured in cubic feet per minute. Two common industry rules of thumb:
- Electric cooktops: roughly 100 CFM per linear foot of cooking surface. A 36-inch range → about 300 CFM as a floor.
- Gas ranges: total BTU rating ÷ 100. A 60,000 BTU range → about 600 CFM.
These are starting points, not gospel. A household that sears steak and uses a wok several nights a week needs more capture than one that mostly reheats. Check the range manufacturer’s own recommendation too — some high-output ranges specify a minimum hood capacity.
Width and mounting height
The hood should be at least as wide as the cooktop. Three inches of overhang on each side improves capture noticeably, and it’s worth the extra width if the wall allows it.
Mounting height is set by the insert manufacturer, and it’s not a design preference. Most residential inserts specify somewhere between 24 and 36 inches above the cooking surface. Mount too high and capture drops off fast. Too low and you’re violating clearance specs and cooking with your head in the hood. Get the spec sheet before framing.
Ducting is where quiet hoods are won or lost
Rigid, smooth-wall metal duct. Sized to what the insert calls for — commonly 8 or 10 inches round on higher-CFM units. The shortest practical run with the fewest elbows. Terminated outside through a proper wall or roof cap with a backdraft damper.
Never into an attic, never into a soffit. That just relocates the grease and moisture.
One code item people miss: the International Residential Code requires make-up air for kitchen exhaust systems above 400 CFM. Adoption and amendments vary by jurisdiction, so confirm locally — but if you’re speccing a 900 CFM insert, assume make-up air is part of the budget and the plan, not a surprise.
If your range sits on an interior wall with no realistic duct path, that’s a real constraint worth resolving early. Recirculating inserts with charcoal filters exist and they handle odor and some grease, but they return heat and moisture to the room. It’s a compromise, not an equivalent. Our guide to upgrading your home ventilation covers the wider picture, and if you’re currently venting through an over-the-range microwave, that setup has its own limitations worth understanding before you commit to a custom enclosure.
Three Ways Arched Range Hoods Get Built
Plaster over curved framing
The traditional approach and the one that produces the best curve. A carpenter builds a framework — plywood or MDF ribs — then it’s sheathed, and a plasterer applies lime or Venetian plaster in multiple hand-troweled coats.
The finish has depth you can’t fake with paint. It also requires a plasterer who does this regularly. This is the most expensive route and the one most likely to look genuinely custom.
Bent drywall with a skim coat
Flexible drywall board bends to a radius, then gets taped, skimmed, and finished with a textured paint or limewash product. Significantly cheaper, achievable by a good drywall crew, and convincing from six feet away.
The tell is usually the transitions. Where the curve meets the wall or the ceiling, a slightly soft joint reads as a mistake rather than a texture. Insist on crisp terminations.
Clad in wood, tile, or stone
A curved substrate wrapped in another material. Tile on a curve is demanding work — you need small format or handmade tile with enough grout flexibility to follow the radius. Wood cladding on a gentle arch can be beautiful; if you like that direction, the same logic behind wood ceiling panels applies here, including how the species will shift in color over time above a heat source.
Proportion: The Part Most People Skip
A weak arch is worse than no arch. A few things that separate a hood that looks designed from one that looks like a drywall accident:
- Commit to the curve. A shallow radius reads as a construction error. If the ceiling height won’t support a real arch, a flat-faced hood with a clean profile is the better call.
- Let it breathe. An arched hood needs wall around it. Squeezing one between two upper cabinets kills the effect — this works best with open shelving or nothing at all on either side.
- One arch per room. Arched hood, arched doorway, arched niche, arched mirror — at that point it’s a theme, not architecture.
- Check the standing view. Look at the proposed hood from where you actually stand: the sink, the island, the doorway. Elevations flatten everything.
- Plan the lighting. The insert’s lights handle the cooktop. The hood itself usually needs something else in the room to model the curve, or it goes flat and dead. Our breakdown of kitchen light fixture types is a useful starting point.
What It Costs — and What Drives the Number
Two line items, and they behave differently.
The insert is a product with a price. Entry-level liners are modest; high-CFM units from premium brands run considerably higher. This part is predictable — you can shop it.
The enclosure is labor, and it’s where the range widens dramatically. Bent drywall with a painted or limewash finish is a manageable add-on for a crew already on site. True hand-troweled lime plaster over custom curved framing is specialty work priced accordingly. Tile on a radius sits somewhere between, and depends heavily on tile choice.
Cost also rises sharply if the duct route doesn’t exist yet, if make-up air is triggered, or if the wall needs structural work to carry the assembly.
Get line-item quotes that separate insert, framing, finish, electrical, and duct work. That’s the only way to tell whether a bid is high because the finish is expensive or because the venting is complicated. The same discipline applies across a kitchen project — it’s the approach we recommend in our breakdown of cabinet refacing costs, and it holds here.
Living With One
Cleaning. Baffle filters come out and go in the dishwasher — this should be easy, and if the arch makes it awkward, the design is wrong. Plaster near a cooktop benefits from a sealer or wax; ask your plasterer specifically what they applied and how to clean it.
Repairs. Plaster chips. The upside is that a skilled hand can patch and re-trowel a section, which is more than you can say for a dented stainless hood. Keep a note of the exact product and color.
Resale. A well-executed arched hood is a genuine asset in a kitchen where it fits the house. In a 1970s ranch with builder-grade everything else, it can read as an isolated splurge. If a sale is on the horizon, it’s worth thinking about the whole-kitchen picture — our guide on whether to update your kitchen before selling is a reasonable gut check.
Finally: coordinate the hood with your countertop decision rather than after it. The hood sets the temperature of the whole wall, and a warm plaster curve above cool grey quartz can feel disconnected. Our butcher block vs. quartz comparison walks through the trade-offs.
Key Takeaways
- An arched range hood is a custom enclosure wrapped around a separately purchased insert — the curve is decoration, the insert is the ventilation.
- Size the insert and duct route first, then design the arch around the clearances. Doing it backwards produces beautiful hoods that vent poorly.
- Rough CFM starting points: ~100 CFM per linear foot for electric, total BTU ÷ 100 for gas. Confirm against your range’s own spec.
- Exhaust above 400 CFM typically triggers a make-up air requirement under the IRC — verify local adoption before you budget.
- Three build paths: hand-troweled plaster (best result, highest cost), bent drywall with a skim coat (strong value), or clad in wood/tile/stone.
- Commit to a real radius and leave wall space around it. Shallow arches squeezed between cabinets read as mistakes.
- Get quotes broken into insert, framing, finish, electrical, and duct so you can tell what’s actually driving the price.
FAQ — People Also Ask
Is an arched range hood just a cover, or does it actually vent?
Both, but the venting comes from the insert hidden inside it — a stainless liner with the blower, filters, and lights. The arch is the visible shell. A well-built one vents exactly as well as its insert allows.
How much airflow do I need for an arched range hood?
Plan around roughly 100 CFM per linear foot of cooktop for electric, or total BTU ÷ 100 for gas. Then check the range manufacturer’s recommendation, since high-output burners often call for more. Heavy searing and wok cooking justify sizing up.
Can I build an arched range hood over an existing stainless hood?
Sometimes, but don’t assume. Standard stainless hoods aren’t designed to be enclosed, and boxing one in can block access to filters and controls or trap heat. The clean solution is swapping to a purpose-built insert. Before opening any existing enclosure, locate ductwork, wiring, and framing first.
Do arched range hoods have to be plaster?
No. Plaster is the most common finish because it suits the curve, but bent drywall with textured paint or limewash, wood cladding, small-format tile, and stone are all workable. Plaster gives the most depth; drywall gives the best value.
How high should an arched range hood be mounted above the stove?
Follow the insert manufacturer’s spec — usually between 24 and 36 inches above the cooking surface. This is a clearance and capture requirement, not a design choice. Mounting too high reduces capture significantly.
Are arched range hoods hard to clean?
The filters shouldn’t be. Baffle filters slide out and go in the dishwasher, and if the enclosure makes that awkward, the design needs revisiting. The plaster surface itself usually needs a sealer or wax near the cooktop — confirm with whoever applies it.
Will an arched range hood date quickly?
Curved plaster hoods have appeared in Mediterranean and vernacular architecture for centuries, so the form itself isn’t new. What dates is over-styling — heavy ornament, trend colors, or repeating the arch motif throughout the room. A simple curve in a quiet finish ages well.
Do I need a permit?
Often yes, particularly if the work involves new ductwork, a new exterior penetration, electrical changes, or make-up air. Requirements vary by jurisdiction. Ask your contractor to confirm before demolition, not after.