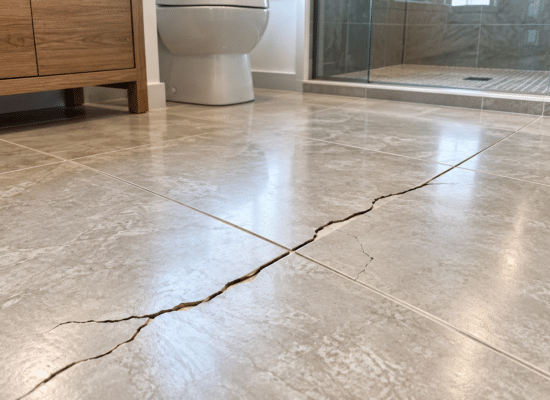



A bathroom leak rarely starts as a dramatic puddle. More often, it begins at a shower threshold, toilet flange, loose grout joint, or floor-to-wall corner and quietly works its way into the subfloor. Learning how to waterproof a bathroom floor gives you a chance to stop that damage before tile goes down, when the work is still accessible and affordable. Understanding how to waterproof a bathroom floor can save you from extensive repairs.
Table Of Content
- Decide How Much of the Bathroom Floor to Waterproof
- Choose a Waterproofing System That Fits the Job
- Gather Materials Before You Open the Membrane
- How to Waterproof a Bathroom Floor Step by Step
- Start with a clean, solid, flat base
- Plan the membrane and wall transitions
- Apply the waterproofing without shortcuts
- Seal the drain and test before tile
- Install tile, then finish flexible joints correctly
- Common Mistakes That Lead to Hidden Damage
- Budget and DIY Reality Check
This is a manageable DIY project for a careful homeowner, especially in a small bathroom with a straightforward layout. The key is treating waterproofing as a continuous system, not a coat of paint or a bead of caulk around the edges. Your membrane, seams, corners, drain connection, and wall transitions must all work together.
Knowing how to waterproof a bathroom floor correctly is crucial for maintaining the integrity of your home.
Decide How Much of the Bathroom Floor to Waterproof
The right approach depends on how the room is used. In a typical bathroom with a tub or a contained shower, waterproofing the shower area and making the rest of the tiled floor water-resistant is common. Still, a full-floor membrane is smart insurance when you have young children, aging plumbing, a busy family bathroom, or a bathroom above finished living space.
For a curbless shower, wet room, or bathroom where the shower opens directly onto the floor, waterproof the entire floor and run the membrane several inches up every wall. The floor also needs a deliberate slope toward the drain. Tile and grout are not waterproof, so they cannot replace this step.
Additionally, it is essential to remember that learning how to waterproof a bathroom floor can help prevent costly water damage.
Before you begin, check your local building requirements and the instructions for your chosen waterproofing system. Shower construction details can be code-sensitive, particularly drain height, curb construction, and flood testing. If you are changing plumbing, moving a drain, or building a curbless shower over a wood-framed floor, bringing in a licensed plumber or tile professional for that portion can prevent an expensive redo.
Choose a Waterproofing System That Fits the Job
Most DIY bathroom projects use one of two systems: a liquid-applied membrane or a sheet membrane. Both can work well when installed exactly as their manufacturer requires.
Liquid-applied membranes are rolled, brushed, or troweled onto the prepared floor. They are especially handy around toilet openings, pipes, corners, and awkward room shapes. The catch is thickness. A thin coat may look covered but can fail to form a true waterproof layer. You usually need two coats, applied in opposite directions, with reinforcing fabric at corners and changes of plane when the system calls for it.
Sheet membranes are bonded to the floor with thinset mortar and sealed at the overlaps using the manufacturer’s specified method. They provide a consistent thickness and are easier to inspect visually. They cost more upfront and require more careful cutting, but many first-time tile installers find the process more predictable.
If you are unsure how to waterproof a bathroom floor, consulting with a professional can provide clarity.
Avoid mixing components from unrelated brands. A drain collar, seam tape, sealant, and membrane are tested as a system. Saving a few dollars by improvising at the seams can erase the value of the waterproofing altogether.
Gather Materials Before You Open the Membrane
Have the waterproofing system, compatible thinset mortar, a notched trowel, roller or brush if needed, seam tape or inside corners, mixing bucket, utility knife, measuring tape, and a margin trowel ready. You will also need a straightedge, level, and clean sponges.
For subfloor repairs, keep exterior-rated plywood, corrosion-resistant screws, construction adhesive, and patching compound on hand. If you are working around a shower drain, confirm that the drain assembly is compatible with your chosen membrane before setting anything in mortar.
This is not the place to buy the cheapest thinset. Use the mortar specified by the membrane manufacturer. The wrong mortar can prevent proper bonding, even if the floor looks fine on installation day.
How to Waterproof a Bathroom Floor Step by Step
Start with a clean, solid, flat base
Remove old flooring, thinset residue, loose fasteners, dust, wax, and adhesive. Waterproofing does not repair a weak floor. If the subfloor is soft, stained from old leaks, delaminated, or noticeably bouncy, replace or reinforce it before moving forward.
Once you have prepared the surface, you can start to understand how to waterproof a bathroom floor effectively.
Check for flatness with a long straightedge. Tile does not need a perfectly level floor outside a shower, but it does need a flat surface. Fill low spots and sand or correct high spots with products approved for your subfloor. In a shower area, create the required slope before installing the membrane, generally directing water toward the drain at about 1/4 inch per foot.
If you are installing cement backer board, fasten it according to its instructions and tape the board seams with alkali-resistant mesh tape and thinset. Some modern membranes can go directly over properly prepared plywood or other approved substrates, so follow the system instructions rather than adding layers by habit.
Plan the membrane and wall transitions
Dry-fit sheet membrane pieces before mixing mortar. Aim for simple layouts with minimal seams, and avoid placing a seam directly over a subfloor joint if possible. Cut openings for the toilet flange and supply pipes neatly, but do not leave oversized gaps that are difficult to seal.
At minimum, turn the waterproofing up the bathroom walls a few inches. In a shower or wet room, extend it to the height required by the system and code. The floor-to-wall joint is one of the most vulnerable places in the room, so use preformed inside corners or reinforcing banding instead of relying on a heavy coat of membrane alone.
Do not trap the toilet flange below finished tile. In most installations, the flange should sit on top of the finished floor so the wax ring or wax-free seal can compress correctly. Plan your tile and underlayment thickness before locking in the flange height.
Apply the waterproofing without shortcuts
For a liquid membrane, first treat corners, board seams, pipe penetrations, and the drain area with the required reinforcing fabric or banding. Then apply the first full coat at the manufacturer’s coverage rate. A wet-film gauge is inexpensive and helpful because appearance alone cannot confirm thickness.
Let the first coat dry fully before applying the second. The surface should have uniform color with no pinholes, bare patches, bubbles, or thin spots. Respect drying times, especially in humid bathrooms. Rushing tile onto a membrane that has not cured can compromise the bond and the waterproof layer.
For a sheet membrane, spread thinset with the required trowel, press the sheet firmly into place, and work outward with a flat trowel to remove air pockets. Follow the required overlap at every seam. Seal each overlap, corner, and pipe penetration with the approved band or sealant. Then check that no edges have lifted and that the membrane is fully supported.
Finally, ensuring you know how to waterproof a bathroom floor will help maintain its durability.
Seal the drain and test before tile
A shower drain is not a detail to guess at. Use the bonding flange, collar, or drain connection designed for your membrane. The membrane must create a watertight connection to the drain, not simply stop near it.
If you waterproofed a shower pan or wet-room floor, perform a flood test before installing tile. Plug the drain, fill the area to the appropriate level without overtopping the curb or room transition, and let it sit for the period required by local code or your system instructions. Mark the water level and inspect below the bathroom, if accessible, for signs of leakage.
A flood test may feel like a delay, but it is one of the lowest-cost ways to catch a failed seam while repairs are still simple. Do not test a standard bathroom floor without a contained shower or safe perimeter, since water can escape into adjacent rooms.
This crucial step in learning how to waterproof a bathroom floor should not be overlooked.
Install tile, then finish flexible joints correctly
Once the membrane is approved and fully cured, set tile with the compatible thinset. Use grout after the tile has set, then seal cement-based grout if the product calls for it. Grout sealer helps resist staining and makes cleaning easier, but it is not the waterproofing layer.
Once the tile is finished, review how to waterproof a bathroom floor to ensure complete protection.
At floor-to-wall intersections, around tubs, and where tile meets a shower curb, use a color-matched flexible sealant rather than rigid grout. Buildings move slightly with seasonal changes, and those movement joints need to flex instead of crack. Recheck caulk periodically and replace it when it pulls away, splits, or develops mold that will not clean off.

Common Mistakes That Lead to Hidden Damage
Understanding common mistakes when learning how to waterproof a bathroom floor can save you time and money.
The most common failure is assuming tile, grout, or cement board is waterproof. They are not. Another is applying liquid membrane too thinly or skipping reinforcing fabric at seams and corners. DIYers also run into trouble when they waterproof over a dirty substrate, use incompatible products, or tile before the membrane has cured.
It is also easy to focus only on the shower and forget the toilet area. A failed wax ring can release water slowly for months, damaging a plywood subfloor without obvious signs from above. Extending a floor membrane around the toilet opening is a practical upgrade, particularly during a full bathroom renovation.
Budget and DIY Reality Check
A successful renovation relies on knowing how to waterproof a bathroom floor properly.
For a small bathroom floor, waterproofing materials commonly cost roughly $150 to $500, depending on room size, substrate repairs, and whether you choose a liquid or sheet system. That figure does not include tile, new drain parts, labor, or major subfloor replacement. A curbless shower or full wet-room conversion can cost considerably more because it may require reframing, drain relocation, and careful floor-slope work.
DIY makes sense when the floor structure is sound, the layout is simple, and you can work patiently through the manufacturer’s instructions. Hire help when there is rot, significant floor deflection, plumbing changes, a second-story leak history, or a curbless design. Those are the details that determine whether a beautiful bathroom stays dry for years.
Think of waterproofing as the layer you hope no one ever notices. When the tile is finished and the room is back in use, that quiet protection is what lets your next bathroom project feel like an upgrade instead of a future repair bill.
In conclusion, mastering how to waterproof a bathroom floor is the key to a long-lasting and beautiful space.